")
Go ahead, indulge and enjoy! This chocolate bark is filled with health-boosting ingredients – good quality chocolate, nuts, seeds, and dried fruit – all working together to satisfy that treat craving. It’s great for holiday gatherings (or anytime), or to give as a gift.
NOTES:
- This chocolate bark is easily customizable – use any favorite nuts, seeds, or dried fruit.
- For a nut-free version, keep the dried fruit and seeds (if acceptable) and add a sprinkling of unsweetened coconut.
- Most dark chocolate is vegan-friendly and gluten-free, but check the labels to be sure.
- Use good quality chocolate for the best flavor, nutritional benefits, and texture results. There are many brands on the market, and here are a few of my favorites: Endangered Species, Equal Exchange, Guittard, Hu, Scharffen Berger, Theo, and Wegmans Dark Chocolate Bar
Equipment:
- baking/cookie sheet (15” x 10” works well)
- parchment paper
- measuring cup and measuring spoons
- chef’s knife
- cutting board
- small mixing bowl (microwave safe, glass recommended)
- silicone or rubber spatula
- instant-read thermometer (reads between 80 – 130°F)
Makes: one sheet of chocolate bark, approximately 11” x 8”
INGREDIENTS
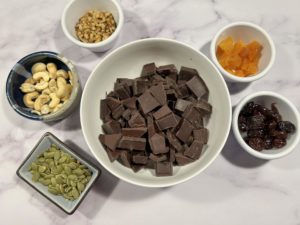
9 ounces good quality dark or semi-sweet chocolate (65% cacao or higher), chopped into small, uniform pieces (about 2 cups chopped; divided 7 ounces and 2 ounces)
1/4 cup dried cherries
1/4 cup dried apricots, cut into small pieces
1/4 cup salted cashew nuts
1/8 cup chopped walnuts
1/8 cup roasted, salted pumpkin seeds
DIRECTIONS
- Line the baking/cookie sheet with parchment paper and set aside.
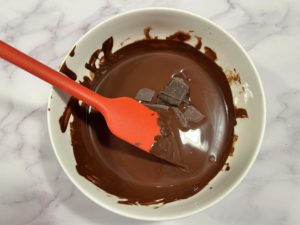
- Prep all of the ingredients before starting to melt the chocolate. Chop the chocolate into small, uniform pieces. This helps them to melt more easily and evenly and aids the tempering process.
- Place 7 ounces of the chocolate (about 1 1/2 cups) into a glass microwave-safe bowl. Begin melting the chocolate in the microwave for 30 seconds at 50% power. Stir, and repeat heating at 30-second intervals (50% power) until the chocolate is almost completely melted.
- Remove the bowl from the microwave and stir until fully melted and smooth. Check the internal temperature of the chocolate in the center of the bowl, careful not to touch the probe on the bottom of the bowl. The temperature should be between 100° – 110°F.
- If not hot enough, reheat the chocolate in the microwave for 15 – 20 seconds.
- Avoid heating the chocolate higher than 120°F.
-
- Add the remaining 2 ounces of chocolate (about 1/2 cup) to the bowl in two batches (1 ounce or 1/4 cup each) and stir until melted and very smooth. Make sure the chocolate is completely melted before adding more. This is called “seeding” the chocolate to temper it. The chocolate will cool slightly and become a bit thicker during this process. Check the internal temperature – the ideal temperature for tempered chocolate is between 84° – 91°F.
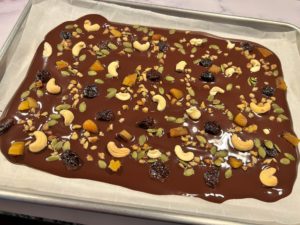
- Pour the smooth, melted, tempered chocolate onto the parchment paper on the baking/cookie sheet. Using the silicone spatula, spread it out evenly to make a rectangle, approximately 11” x 8”. A smaller rectangle can be made if you prefer thicker bark.
- Sprinkle the toppings over the melted chocolate, working quickly – dried cherries, dried apricots, cashew nuts, walnuts, and pumpkin seeds. Allow the chocolate to set undisturbed and away from water and heat for a minimum of 4 hours.
-
- Once the chocolate bark is fully set, carefully transfer it along with the parchment paper to a large cutting board. Cut the bark into desired size of serving pieces. Store the chocolate bark in an airtight container.
- The chocolate bark will last for up to 2 weeks at room temperature
- If refrigerated, bring it to room temperature prior to serving. Refrigerating chocolate can cause it to form white spots called “bloom”. This is not harmful, and does not affect the flavor or quality of the chocolate, yet may appear less visually appealing.
- Once the chocolate bark is fully set, carefully transfer it along with the parchment paper to a large cutting board. Cut the bark into desired size of serving pieces. Store the chocolate bark in an airtight container.

Photos: Love + Craft Kitchen
© 2022 Love + Craft Kitchen, LLC, All Rights Reserved
Recent Comments